Finished deck patio with outdoor furniture and mountain backdrop

Seamless Indoor
Outdoor Concrete
Starts Here

The Even Entry Bracket System: the simplest way to create a flush concrete threshold and level entry connection between your home and outdoor living space.

Get in Touch

A Smarter Way to Achieve a Level Entry Concrete Threshold

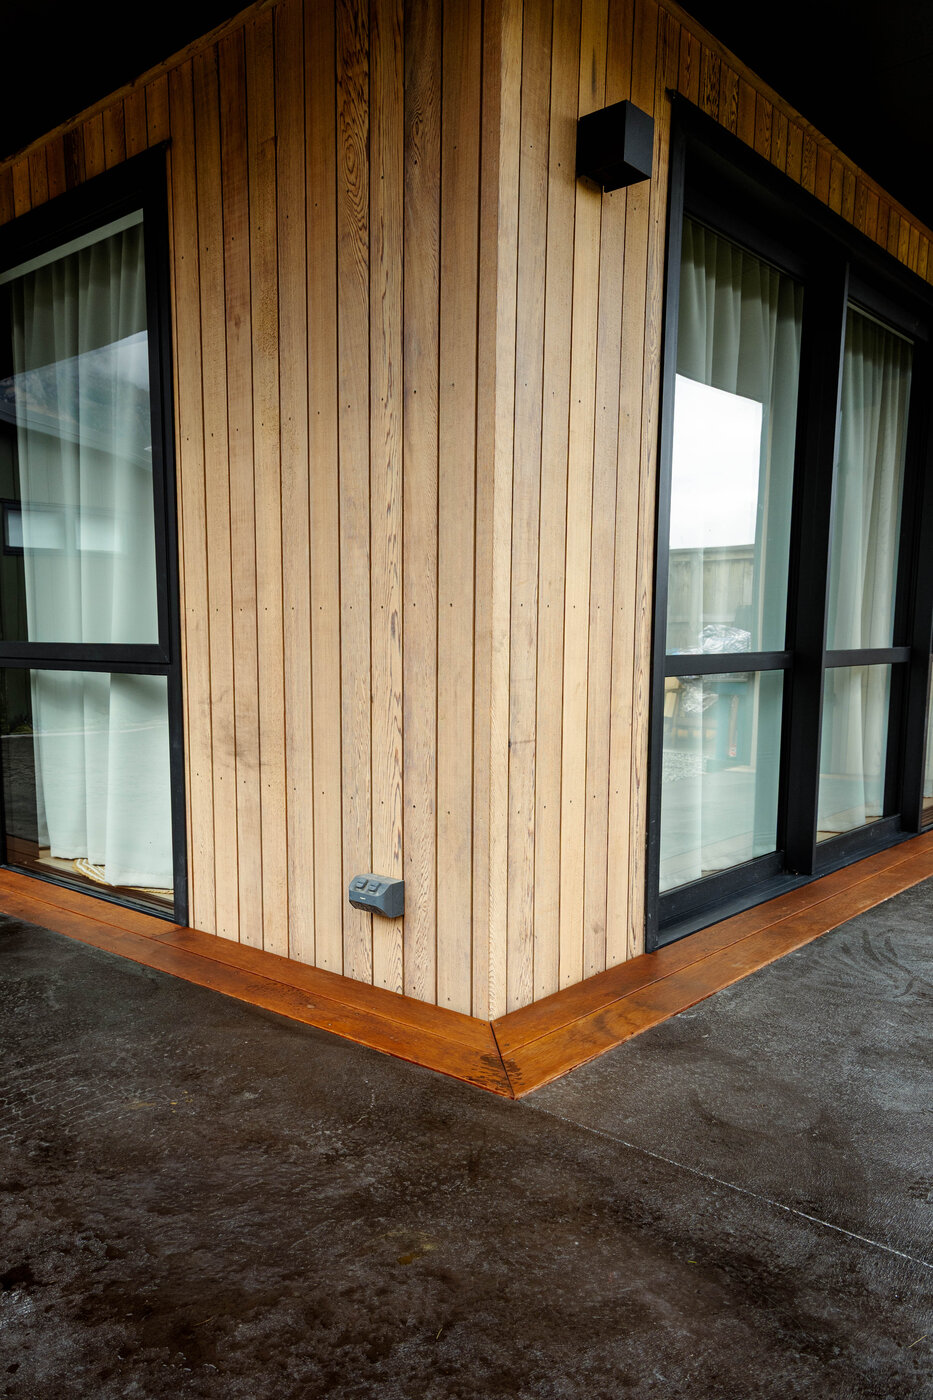
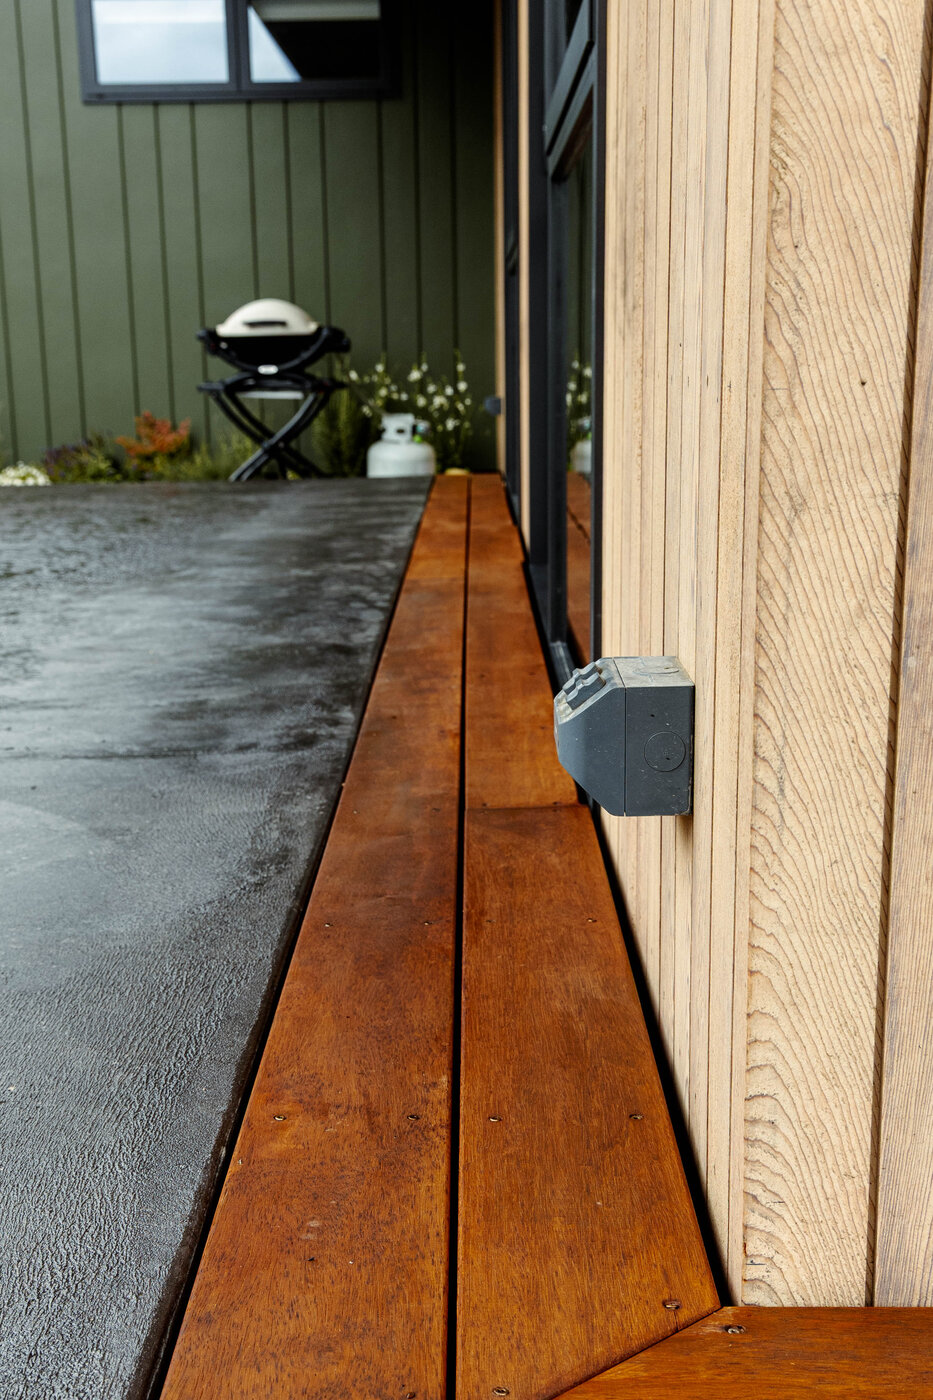
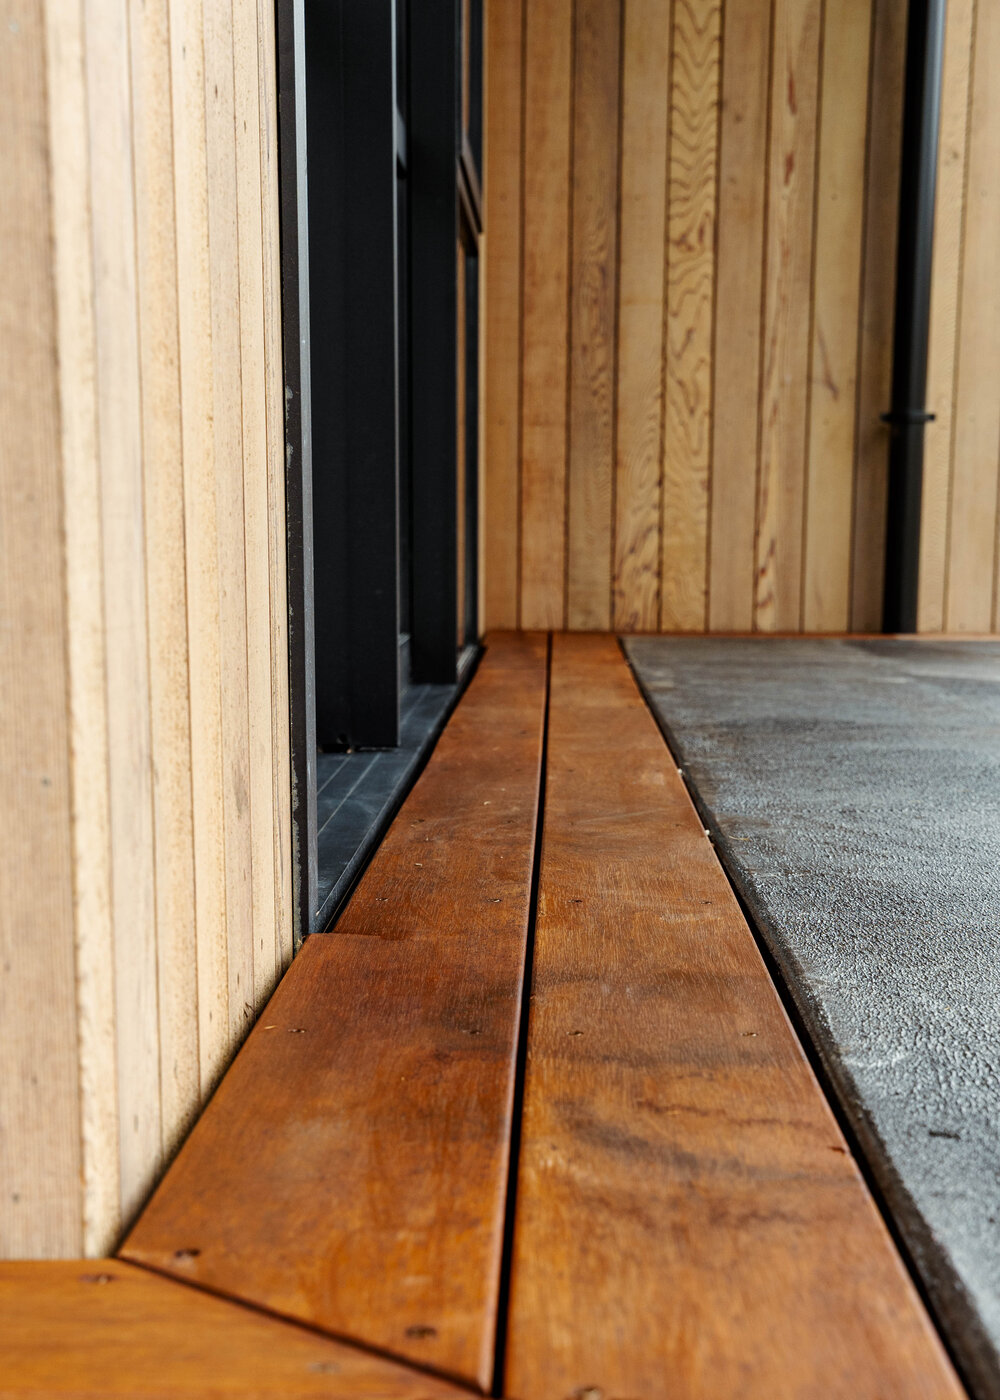
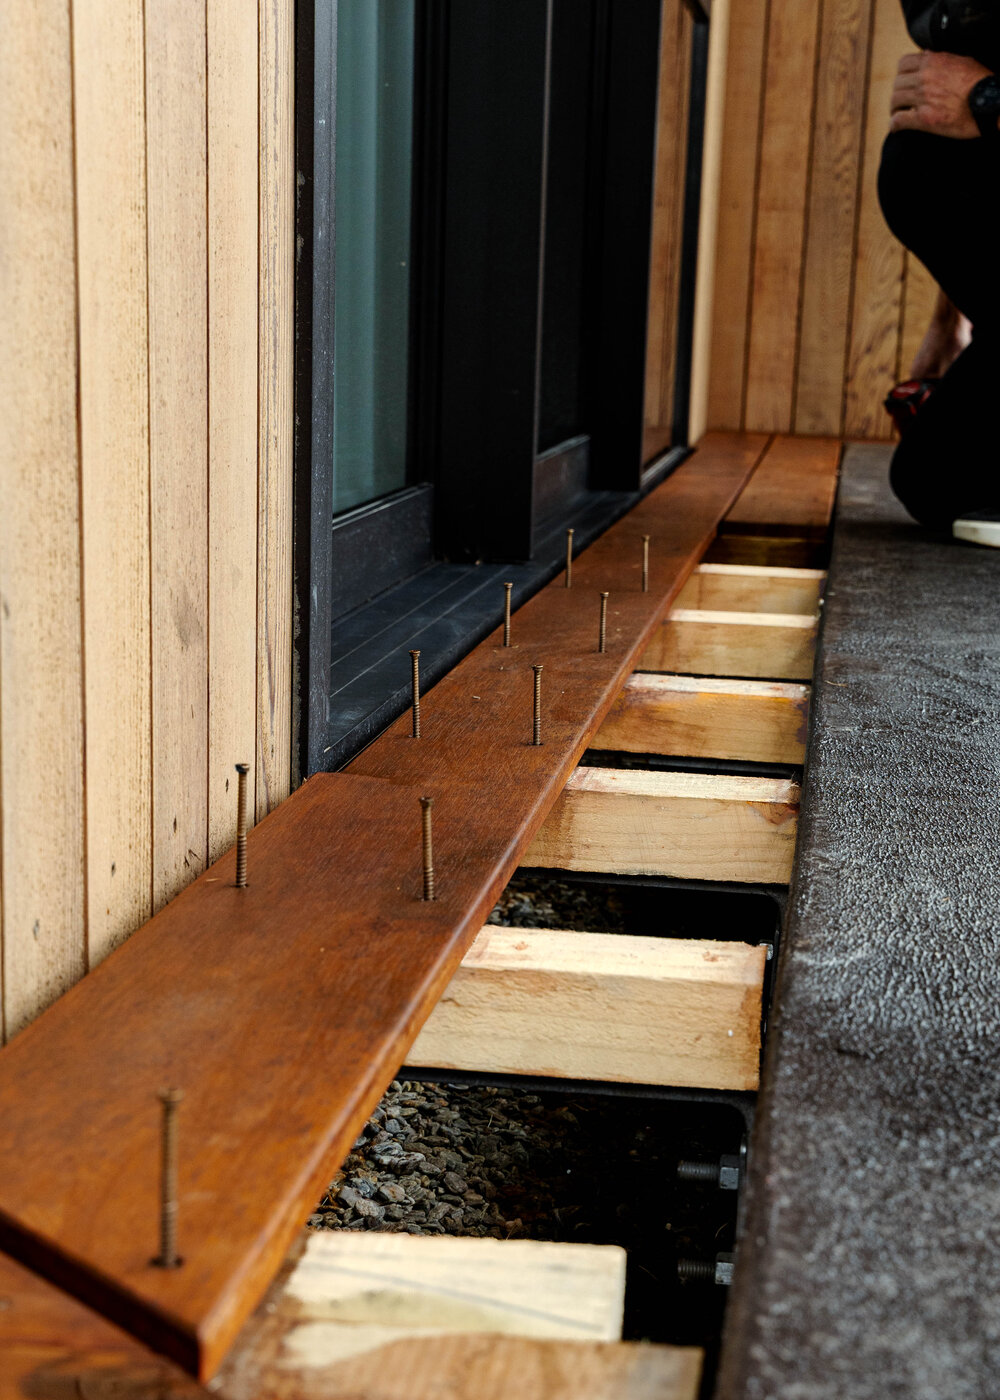
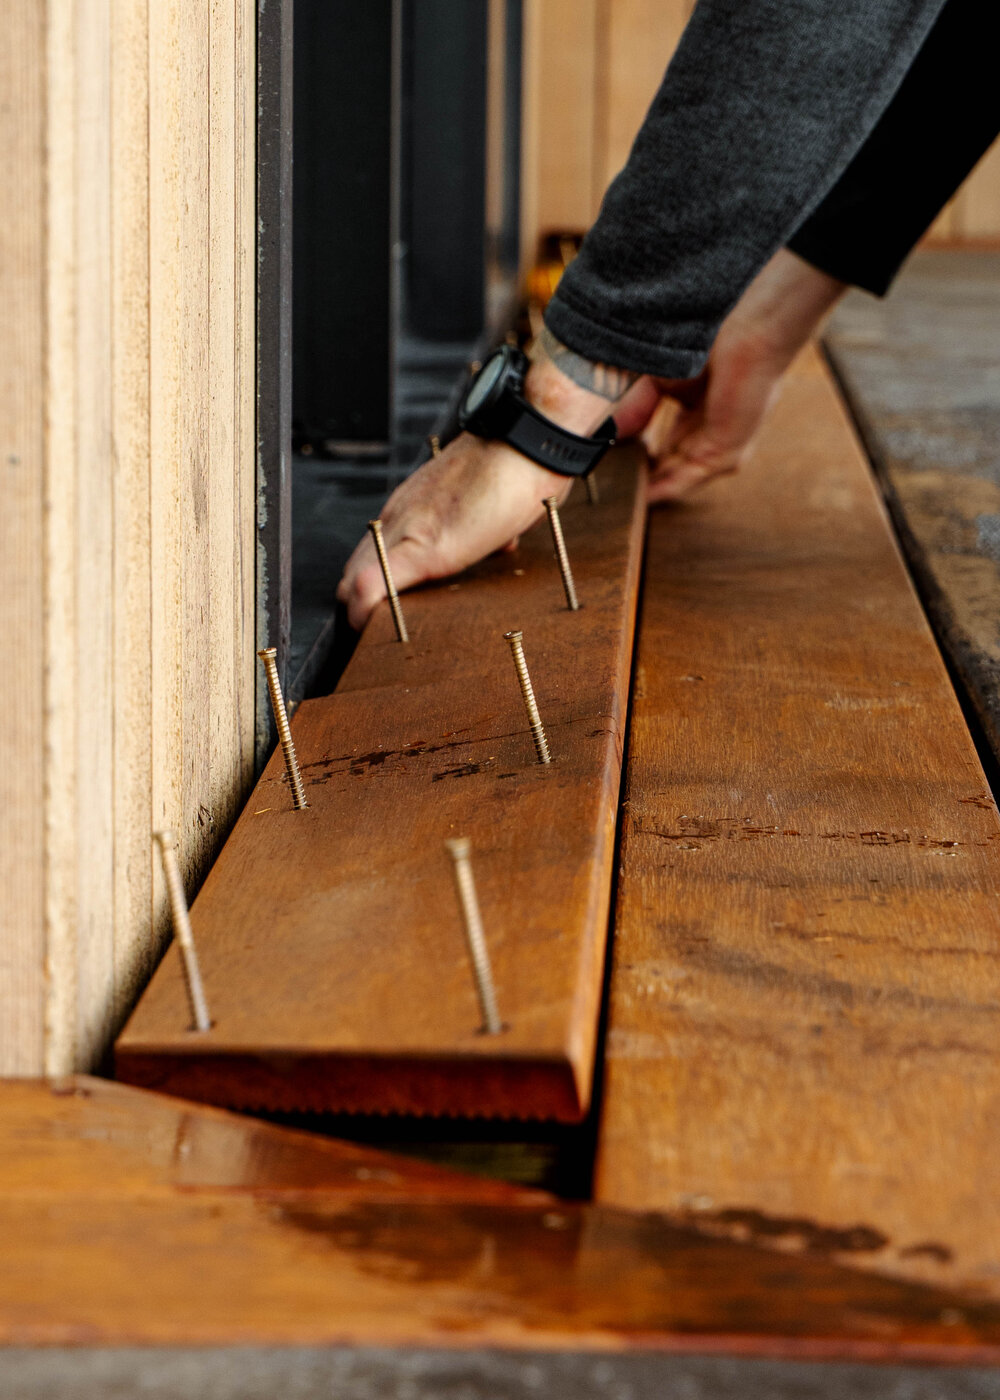
The Even Entry Bracket System is a smart, cost-effective solution for creating a seamless indoor outdoor concrete connection at your door entry. Engineered for strength, accuracy, and ease of installation, it securely anchors your decking subframe to concrete while ensuring perfect height alignment with your door threshold.

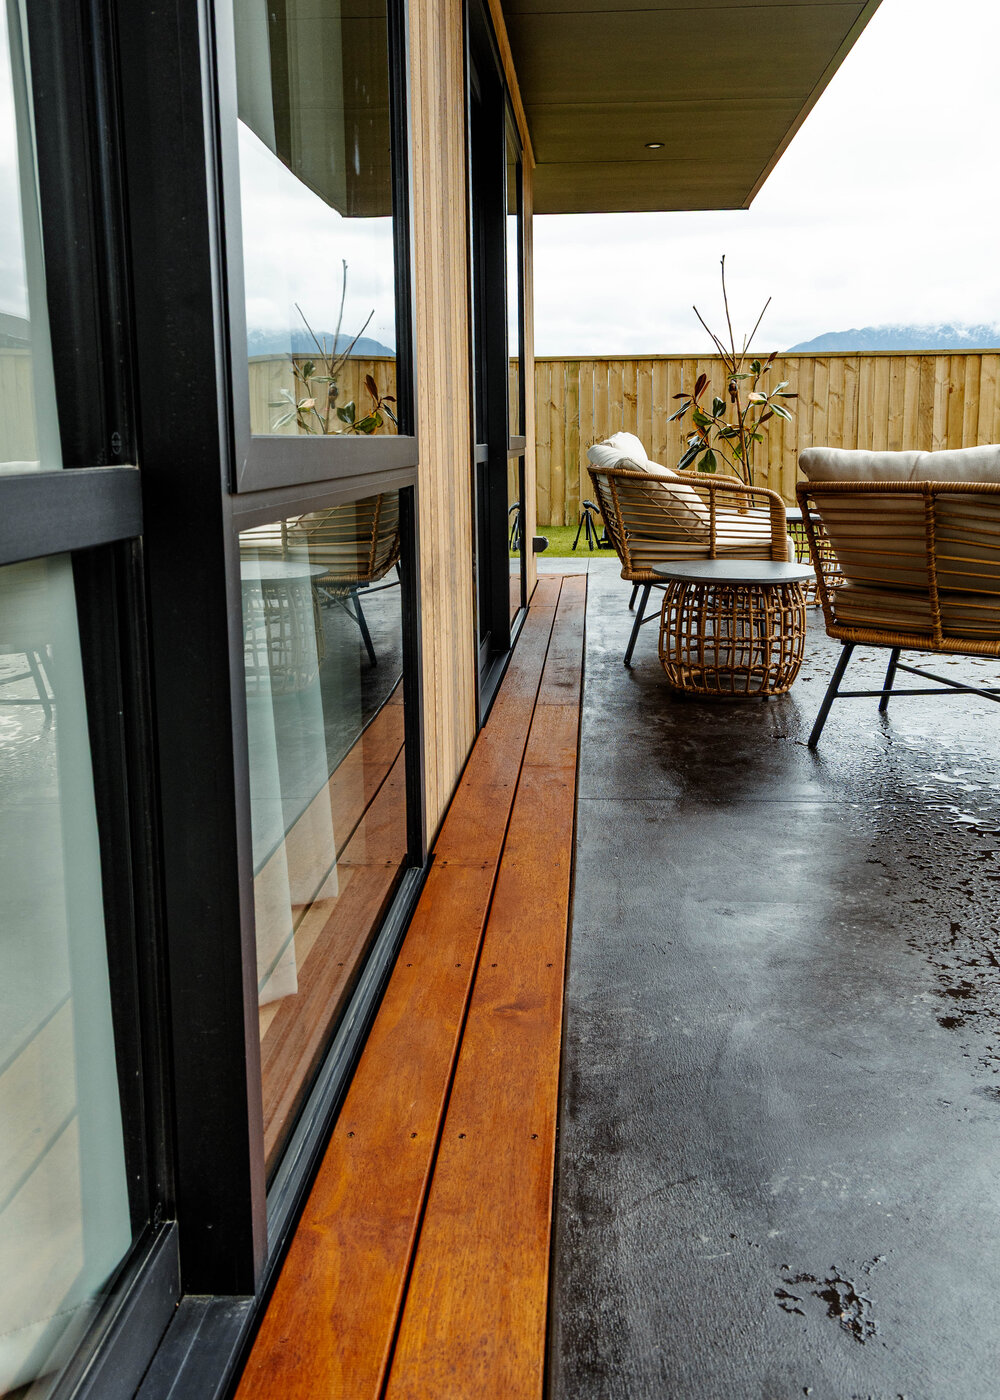
The result is a flush concrete threshold with no step required, creating a smooth level entry surface ideal for wheelchair access and mobility-friendly entryways. It works with any standard level entry concrete patio, whether standard grey or exposed aggregate.

Pre Order
Even Entry bracket system installed on a completed deck entry

Built for Performance, Designed for Simplicity

Seamless Indoor-Outdoor Flow

Achieve a perfectly flush connection between your interior floor and your outdoor deck for a cohesive, architectural finish.

Wheelchair and Mobility Friendly

The smooth, level surface created by Even Entry is ideal for wheelchair users and anyone who needs step-free access.

Cost-Effective Alternative to NZS 3604 Builds

Avoid expensive consent-required structures. Even Entry provides a practical, compliant, and affordable solution for deck entry points.

Strong Bolt-Down Concrete Connection

M12 cup head bolts cast into your concrete slab create a rock-solid anchoring point that holds your subframe firmly in place.

Precise Height Control for a Flush Finish

The bracket system allows fine-tuned height adjustment so your deck boards sit exactly level with your door threshold every time.

Built for NZ Outdoor Conditions

Designed to handle the full range of New Zealand weather, from harsh UV and heavy rain to coastal salt air.

Simpler, Faster, More Affordable

Traditional level entry systems use complex metal grates and concrete drainage channels that add cost, time, and hassle. Even Entry strips all that away. One bracket, standard timber, your choice of decking. Done.

Level Entry System Cost Comparison

Based on a typical 25 lineal metre entry with 50m² concrete

Plastic Grate System
$15,760 RRP
$540/m product + concrete + drainage channel
Stainless Steel Grate System
$32,260 RRP
$1,200/m product + concrete + drainage channel
Best Value
Even Entry Bracket System
$7,125
$180/m bracket + timber + concrete

Outdoor Surface Comparison

How concrete stacks up against common decking options

Surface Type Installed Cost (NZD/m²) Lifespan Maintenance Best For
Treated pine decking $350 to $550 10 to 20 yrs High Cheapest raised deck option
Kwila / hardwood decking $550 to $900 20 to 30 yrs Medium to High Premium timber appearance
Composite decking $500 to $1,050 25 to 40 yrs Low Low maintenance outdoor living
Standard concrete patio $150 to $250 30 to 50 yrs Very low Best all round value
Exposed aggregate concrete $150 to $250+ 30 to 50 yrs Very low Decorative modern finish

The Simplest Level Entry Concrete System Available

No metal grates to source. No concrete drainage channels to form. No complex waterproofing details. Even Entry works with standard building materials your builder already has on site. Fewer components means faster installation, fewer things to go wrong, and a better price for your client.

How It Works

Five straightforward steps from ground prep to a finished deck you can be proud of.

Before You Start: A Few Important Rules

  • Ensure all concrete slopes away from the building.
  • This bracket/channel system must not be used as the primary drainage outlet.
  • The channel must be installed at least 280mm away from the building's foundation.
  • Drainage stone beneath the channel is recommended for best performance.

Ground Prep: Battering, Boxing and Height Setup

Start by battering (sloping) the ground back and boxing out your area.

When compacting the ground, ensure that all M12 bolts cast into the concrete have at least 50mm of concrete surrounding them. This usually means you will need to slope your compacted base to allow for that clearance.

Set up your boxing to match the finished floor level. We recommend positioning your boxing approximately 300mm from the cladding. This allows for:

  • A 12mm gap between the decking and cladding,
  • Two 140mm decking boards,
  • Plus any spacing you desire between boards and the concrete.

Bracket Materials and Marking Out

What you'll need:

  • Even Entry Bracket
  • H3/H4 outdoor timber (we recommend 75x50mm H4)
  • Your chosen decking boards

Spacing Requirements (NZS 3604 Building Code):

  • For 20mm decking, space brackets at 450mm centres max
  • For 32mm decking, space brackets at 600mm centres max

These spacing choices will affect your screw pattern, so plan it nicely for a tidy finish.

Marking Out:

  • Lay out all components (bracket, timber, decking) on a flat surface.
  • Stack them together to measure your total height.
  • Use a set square to mark the centre point for your M12 bolts on the boxing.
  • Once laid out evenly, drill your marks using a 16mm spade bit.

Installing the Bolts (Before Concrete Pour)

You'll need:

  • M12 cup head bolts
  • Square washers
  • Circular washers
  • Nuts

Install your bolts through the boxing:

  • The cup head bolt anchors into the concrete.
  • Inside the boxing: place a square washer hard up against the timber and lock it in with a nut.
  • On the outer side: use a circular washer and another nut.

This sandwiches the bolt securely into place, ready for the concrete pour.

Bracket Installation (Post-Concrete)

Once the concrete is cured and the boxing is removed:

  • Screw your H3/H4 timber into the underside of the bracket using 35mm galvanised TEK screws.
  • Slot the bracket over the M12 bolts protruding from the concrete.
  • Secure with circular washers and nuts.
Tip: Place two offcuts of your decking board on top of each end to make sure the bracket sits at the right height, flush with the concrete and door threshold.

For fine adjustments:

  • Use plastic H-packers or bituminous DPC to pack behind the bracket before tightening.
  • An impact driver makes the job quicker, but a standard socket set works just fine too.

Lay Your Decking

You're now ready to install your decking boards:

  • Maintain a 12mm gap between the decking and any cladding or joinery.
  • Align and space your boards evenly.

Now step back and enjoy the clean, seamless look your Even Entry Bracket system provides!

Let's Talk About Your Project

Get in touch to discuss your project or to place an order. We are happy to answer any questions about the Even Entry Bracket System.

Service Area All of NZ
Please enter your name.
Please enter a valid email address.
Please enter a message.